
What is ResearchKit?
The ResearchKit™ framework is an open source software framework that makes it easy to create apps for medical research or for other research projects.
Requirement
The primary ResearchKit framework codebase supports iOS and requires Xcode 6.3 or newer. The ResearchKit framework has a Base SDK version of 8.0, meaning that apps using the ResearchKit framework can run on devices with iOS 8.0 or newer.
Let’s Code
Step 1 – Create new project (Single view application)

Step 2 – Add ResearchKit Framework to project
- Open terminal
- Clone ResearchKit framework anywhere in your machine by using command
-
git clone https://github.com/ResearchKit/ResearchKit.git3. OR you can directly download Research Framework from https://github.com/ResearchKit/ResearchKit/tree/cb001e2f4e781740bc3a3c6dc494ddfbd97cffea
- Go to just downloaded/clone framework folder
- Drag
ResearchKit.xcodeprojinto your iOS app project in Xcode. - Your Project Navigator should now look like this:

7. Next, select ResearchKitDemo.xcodeproj in the Project Navigator, choose theResearchKitDemo target and the General tab, and then click +under Embedded Binaries, shown below: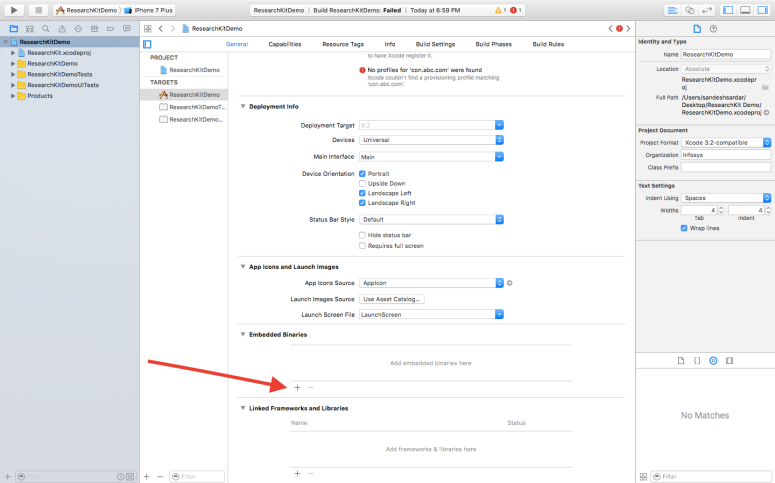
8. Finally, select ResearchKit.framework and click Add:
9. ResearchKit is now included in your project and ready for use. To make sure it’s been included correctly, add the following import to the top of ViewController.swift:
import ResearchKit
Build your project; if your build succeeds, you’re ready to start using the ResearchKit framework!
Informed Consent
A crucial piece of a medical research study is the consent of the test subject. This is an ethical mandate that dates all the way back to the Hippocratic Oath over two thousand years ago; this mandate has been supplemented with modern laws that may vary among the regions where your app is available.
It’s your job to make sure your study obtains consent in a legal manner, and the Consent Module included in ResearchKit is a great place to start as you can spell out the goals and requirements of the study in a series of views with simple, engaging animations.
To begin, create a new, empty Swift file named ConsentDocument.swift, then add to it the following code:
import ResearchKit

public var ConsentDocument: ORKConsentDocument {

  let consentDocument = ORKConsentDocument()
  consentDocument.title = "Example Consent"

  //TODO: consent sections

  //TODO: signature

  return consentDocument
}
Here, you’ve created an ORKConsentDocument, ResearchKit’s representation of the informed consent document for your study. Think of it as the stack of papers on the clipboard handed to you when you arrive at the lab, ready for your signature at the bottom of each page.
Consent Document Contents
The first thing you’ll need to do is define the series of steps you need to spell out the ways this study might impact the user. In ConsentDocument.swift, replace //TODO: consent sections with the following code:
let consentSectionTypes: [ORKConsentSectionType] = [
  .Overview,
  .DataGathering,
  .Privacy,
  .DataUse,
  .TimeCommitment,
  .StudySurvey,
  .StudyTasks,
  .Withdrawing
]
An ORKConsentSectionType is an enum that designates a pre-fab page that covers part of the consent document. You’ve simply defined an array of these enums you’ll use when creating consent sections for displaying the various pages.
ORKConsentSectionType array in the specific order given above, the pages will automatically have smooth, animated transitions as the user navigates forward. They look quite fancy, if you ask me! :]These sections are only recommended, though, not mandatory. If your study doesn’t need any or all of these sections, you can remove them as required, or use one of the following options for ORKConsentSectionType:
- .Custom: These sections have no default content, so you can add anything you need with text, images, or HTML.
- .OnlyInDocument: These sections aren’t displayed to the user, but their contents are included in the summary document for the user’s approval.
Now that you’ve identified the section types to use, you need to create them and give them some content.
Add the following code just below the spot where you defined consentSectionTypes:
var consentSections: [ORKConsentSection] = consentSectionTypes.map { contentSectionType in
  let consentSection = ORKConsentSection(type: contentSectionType)
  consentSection.summary = "If you wish to complete this study..."
  consentSection.content = "In this study you will be asked five (wait, no, three!) questions. You will also have your voice recorded for ten seconds."
  return consentSection
}

consentDocument.sections = consentSections
Here you iterate through the consentSectionTypes array and create an ORKConsentSection for each type. These sections correspond to pages in the consent form. Each section has a default image based on the type, which you can change by setting the customImage property.
The textual content is set by the summary and content properties which provide the title and text for each section. In a real app, you’d definitely use different text on each page, according to its purpose. But for this tutorial, you can simply add the same summary and content to each section.
Collecting a Consent Signature
Signature collection comes built-in with ResearchKit — how easy is that? :]
Replace the //TODO: signature line in ConsentDocument.swift with the following:
consentDocument.addSignature(ORKConsentSignature(forPersonWithTitle: nil, dateFormatString: nil, identifier: "ConsentDocumentParticipantSignature"))
Yup — that’s all the code you need! The only parameter required to create an ORKConsentSignature is identifier, which is a unique String that will distinguish this signature from any other potential signatures that could be present in the document.
ORKConsentSignature can also be pre-populated with a name, image and date. This is useful when you need to include a copy of the principal investigator’s signature in the consent document.The Consent Task
Now that you have the consent document defined, you have to add it to a task in order to present it to the user. Tasks are broken down into two categories: Visual Consent, which are the screens defined by your ORKConsentSections; and Consent Review which involve collection of the signature.
To start, create a new Swift file named ConsentTask.swift, and add to it the following code:
import ResearchKit

public var ConsentTask: ORKOrderedTask {

  var steps = [ORKStep]()

  //TODO: Add VisualConsentStep

  //TODO: Add ConsentReviewStep

  return ORKOrderedTask(identifier: "ConsentTask", steps: steps)
}
This is the first direct appearance of an ORKTask: a protocol which is one of the core organizational units of ResearchKit. Tasks in ResearchKit act as a collection of steps, and an ORKOrderedTask is a common class that implements the ORKTask protocol by presenting its steps in a fixed order.
"ConsentTask" identifier serves to distinguish this task for the purposes of handling its results. The results are outside the scope of this tutorial, but I encourage you to take note of the task identifiers in the sample code and try to retrieve the results yourself.Now you need to add your Visual Consent Step.
Still in ConsentTask.swift, replace //TODO: Add VisualConsentStep with the following code:
var consentDocument = ConsentDocument
let visualConsentStep = ORKVisualConsentStep(identifier: "VisualConsentStep", document: consentDocument)
steps += [visualConsentStep]
Here, you make use of the ConsentDocument from above and use it to create an ORKVisualConsentStep. In other words, you’re telling ResearchKit to create a visual representation of the consent document sections.
Next up is the Consent Review Step.
Replace //TODO: Add ConsentReviewStep with the following code:
let signature = consentDocument.signatures!.first as! ORKConsentSignature

let reviewConsentStep = ORKConsentReviewStep(identifier: "ConsentReviewStep", signature: signature, inDocument: consentDocument)

reviewConsentStep.text = "Review Consent!"
reviewConsentStep.reasonForConsent = "Consent to join study"

steps += [reviewConsentStep]
The ORKConsentReviewStep sets up screens to summarize the consent document, to determine if the user agrees or disagrees to the terms, and to obtain the user’s signature. Just like the ORKConsentSections you defined earlier, the consent review section requires you to set text for the page.
You’ve added both steps to the consent task — all that’s left for the consent portion of your app is to show this task to your user and handle the results.
Presenting the Consent Task
This is a job for your view controller, so open ViewController.swift and add the following:
extension ViewController : ORKTaskViewControllerDelegate {

  func taskViewController(taskViewController: ORKTaskViewController, didFinishWithReason reason: ORKTaskViewControllerFinishReason, error: NSError?) {
    //Handle results with taskViewController.result
    taskViewController.dismissViewControllerAnimated(true, completion: nil)
  }

}
Your view controller now implements ORKTaskViewControllerDelegate by handling task results in taskViewController:didFinishWithReason:error:. These results could be in the form of a signed consent document, survey responses, or sensor data. For now, you are simply dismissing the task’s view controller when the task finishes.
How, then, can you present the task? Add the following method to the ViewController class:
@IBAction func consentTapped(sender : AnyObject) {
  let taskViewController = ORKTaskViewController(task: ConsentTask, taskRunUUID: nil)
  taskViewController.delegate = self
  presentViewController(taskViewController, animated: true, completion: nil)
}
This is a simple method in which you create an ORKTaskViewController with your consent task. ResearchKit will create the UI all on its own from the information contained in the task you pass in.
Once you’ve set the view controller as the task view controller’s delegate, you present the view controller. Now all that remains is to trigger consentTapped!
Open Main.storyboard and add a UIButton to the lone view.
Then, set the button’s title to Consent and connect the button to consentTapped: in your view controller as shown below:

It’s the moment you’ve been waiting for!
Build and run your app; first, page through the cool-looking consent flow:

Take note of all the nice UI presentation and animations that you get for free with ResearchKit; in particular, check out the study detail modal screens. Note how ResearchKit displays your sample text, and how it orders the pages as you defined them.
Once you’ve run through the consent pages, test out the signature screen:
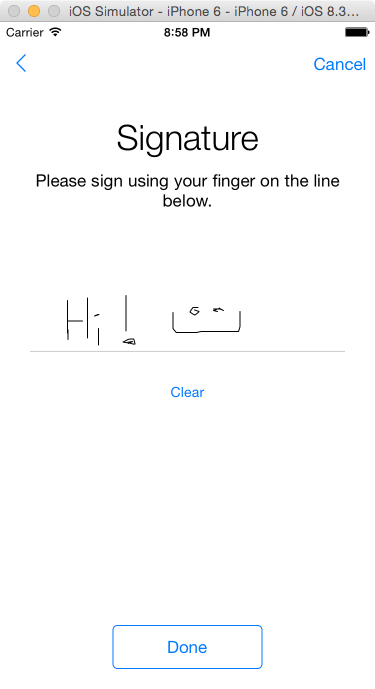
ORK_Log_Debug in ORKHelpers.h within ResearchKit.The Survey Module
Now that you’ve set up the consent portion of your app, you can move on to the meat of your app: the survey. In this section, you’ll create a survey task and present it the same way you did with your consent task.
Create a new Swift file in your project named SurveyTask.swift and populate it with the following code:
import ResearchKit

public var SurveyTask: ORKOrderedTask {

  var steps = [ORKStep]()

  //TODO: add instructions step

  //TODO: add name question

  //TODO: add 'what is your quest' question

  //TODO: add color question step

  //TODO: add summary step

  return ORKOrderedTask(identifier: "SurveyTask", steps: steps)
}
You might have already guessed that your survey would be an ORKOrderedTask, just like your ConsentTask. The difference lies in the steps that you’ll be adding.
Instructions Step
The first step simply displays your survey’s instructions to the user. Replace //TODO: add instructions step with the following:
let instructionStep = ORKInstructionStep(identifier: "IntroStep")
instructionStep.title = "The Questions Three"
instructionStep.text = "Who would cross the Bridge of Death must answer me these questions three, ere the other side they see."
steps += [instructionStep]
This creates and adds an ORKInstructionStep, which is a simple yet highly useful screen you can use any time you need to present instructions to your user. You can optionally include an image via the image property, but that’s not necessary here.
Text Input Question
Next up is your first question, which is an open-ended question that permits user input. Replace //TODO: add name question with the following:
let nameAnswerFormat = ORKTextAnswerFormat(maximumLength: 20)
nameAnswerFormat.multipleLines = false
let nameQuestionStepTitle = "What is your name?"
let nameQuestionStep = ORKQuestionStep(identifier: "QuestionStep", title: nameQuestionStepTitle, answer: nameAnswerFormat)
steps += [nameQuestionStep]
An ORKQuestionStep, like the one you created in the previous section, presents the user with a single question. The answer: parameter, which is of type ORKAnswerFormat, determines the UI for the user input. You’ve used ORKTextAnswerFormat, which lets the user type in their name using the keyboard.
Text Choice Question
Next up is a question where the user must choose among several predefined options. Replace //TODO: add 'what is your quest' question with the following:
let questQuestionStepTitle = "What is your quest?"
let textChoices = [
  ORKTextChoice(text: "Create a ResearchKit App", value: 0),
  ORKTextChoice(text: "Seek the Holy Grail", value: 1),
  ORKTextChoice(text: "Find a shrubbery", value: 2)
]
let questAnswerFormat: ORKTextChoiceAnswerFormat = ORKAnswerFormat.choiceAnswerFormatWithStyle(.SingleChoice, textChoices: textChoices)
let questQuestionStep = ORKQuestionStep(identifier: "TextChoiceQuestionStep", title: questQuestionStepTitle, answer: questAnswerFormat)
steps += [questQuestionStep]
This time, the answer format is ORKTextChoiceAnswerFormat. You define the possible choices for the user, create the question step and then add it to the task.
ORKTextChoiceAnswerFormat format is flexible, and allows for either single-choice or multiple-choice. In this example, you’ve specified .SingleChoiceImage Choice Question
The last question of your survey is similar to the text choice format, in that it requires the user to choose among several predefined options, but with one key difference: the choices are represented by images, not just text.
Download and unzip this pack of six PNG images. Then, add them to your Xcode project in Images.xcassets:

Once you’ve added the images to your project, return to SurveyTask.swift and replace //TODO: add color question step with the following:
let colorQuestionStepTitle = "What is your favorite color?"
let colorTuples = [
  (UIImage(named: "red")!, "Red"),
  (UIImage(named: "orange")!, "Orange"),
  (UIImage(named: "yellow")!, "Yellow"),
  (UIImage(named: "green")!, "Green"),
  (UIImage(named: "blue")!, "Blue"),
  (UIImage(named: "purple")!, "Purple")
]
let imageChoices : [ORKImageChoice] = colorTuples.map {
  return ORKImageChoice(normalImage: $0.0, selectedImage: nil, text: $0.1, value: $0.1)
}
let colorAnswerFormat: ORKImageChoiceAnswerFormat = ORKAnswerFormat.choiceAnswerFormatWithImageChoices(imageChoices)
let colorQuestionStep = ORKQuestionStep(identifier: "ImageChoiceQuestionStep", title: colorQuestionStepTitle, answer: colorAnswerFormat)
steps += [colorQuestionStep]
The key to this question is, again, the answer’s format. Here, you’ve used ORKImageChoiceAnswerFormat, which you initialized with an array of image choices of type ORKImageChoice.
Each ORKImageChoice instructs the step to display an image; when the user selects an image, the step displays the image’s text from the name property and passes the image’s value to the results. ResearchKit takes it from here, and constructs your screen using these images to display a series of buttons.
Summary Step
It’s a good practice to notify your user when the survey is complete; therefore, you’ll need to add a summary step.
Replace //TODO: add summary step with the following:
let summaryStep = ORKCompletionStep(identifier: "SummaryStep")
summaryStep.title = "Right. Off you go!"
summaryStep.text = "That was easy!"
steps += [summaryStep]
Here you create and add an ORKCompletionStep, which is essentially the same as an ORKInstructionStep, except with a nice animated checkmark in the center to thank your user for completing the survey.
Presenting the Survey
Presenting the the survey task is identical to the way you present the consent task. Open ViewController.swift and add the following method:
@IBAction func surveyTapped(sender : AnyObject) {
  let taskViewController = ORKTaskViewController(task: SurveyTask, taskRunUUID: nil)
  taskViewController.delegate = self
  presentViewController(taskViewController, animated: true, completion: nil)
}
Again, you create an ORKTaskViewController, set the current view controller as its delegate, and finally present it.
Open Main.storyboard, add a UIButton with the title Survey, and connect it to surveyTapped: as shown below

Build and run your app; work through your survey and you will see the instruction and summary steps, followed by your three survey questions:


Active Tasks
Active Tasks use on-device sensors, such as the accelerometer, gyroscope, microphone and even the touchscreen, to record data for analysis purposes. In this example, you’ll use the iPhone’s microphone to record audio samples for your study.
Create a new Swift file in your project and name it MicrophoneTask.swift. Populate it with the following code:
import ResearchKit

public var MicrophoneTask: ORKOrderedTask {
  return ORKOrderedTask.audioTaskWithIdentifier("AudioTask", intendedUseDescription: "A sentence prompt will be given to you to read.", speechInstruction: "These are the last dying words of Joseph of Aramathea", shortSpeechInstruction: "The Holy Grail can be found in the Castle of Aaaaaaaaaaah", duration: 10, recordingSettings: nil, options: nil)
}
Here you’re using an ORKOrderedTask with a custom initializer which produces an audio task that displays your instructions and records the user’s voice for a length of time.
Yup, it’s that simple — you simply specify the instructions and the duration of your task, and ResearchKit provides the rest of the UI for free! :]
The final step is to connect this task to your UI. Add the following method to ViewController.swift:
@IBAction func microphoneTapped(sender : AnyObject) {
  let taskViewController = ORKTaskViewController(task: MicrophoneTask, taskRunUUID: nil)
  taskViewController.delegate = self
  taskViewController.outputDirectory = NSURL(fileURLWithPath: NSSearchPathForDirectoriesInDomains(.DocumentDirectory, .UserDomainMask, true)[0] as! String, isDirectory: true)
  presentViewController(taskViewController, animated: true, completion: nil)
}
This should look familiar by now, except for one new line where you specify a valid NSURL to taskViewController.outputDirectory. The ResearchKit documentation states the following: “If no output directory is specified, active steps that require writing data to disk, such as those with recorders, will typically fail at runtime.”
Finally, open Main.storyboard, add a third UIButton titled Microphone, and connect it to microphoneTapped: as shown below:

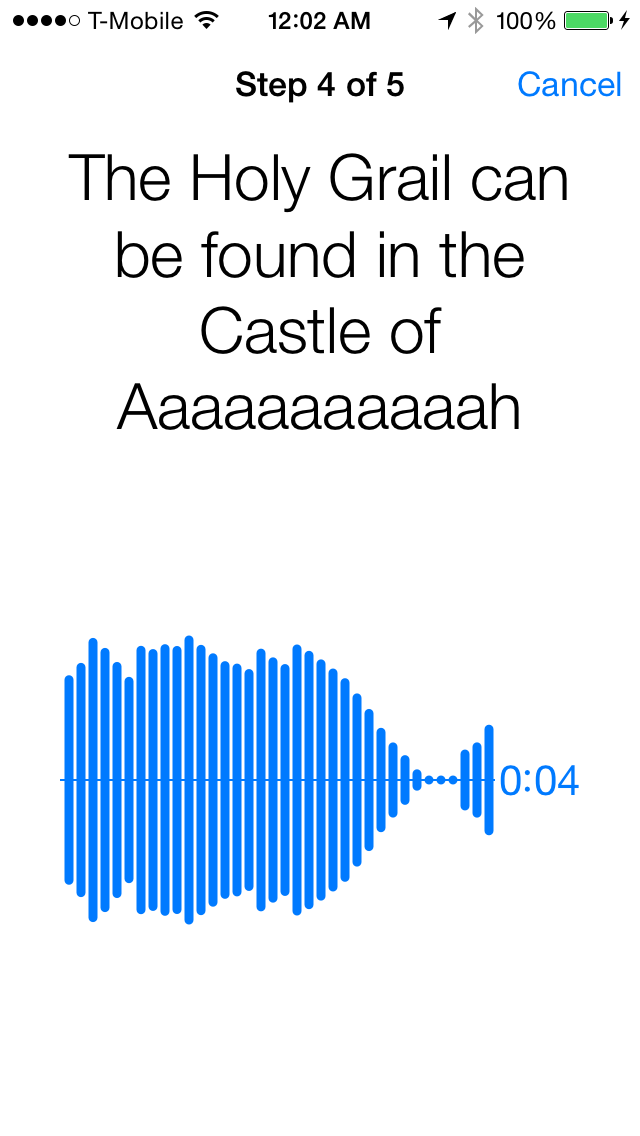
Build and run your app; tap the Microphone button to try out your new task. In the simulator, the task will simply count down, but if you run your app on a real device you can watch the waveform react to your voice:
 You can download source code

Hope you find this blog useful. Please feel free to contact with me in case you have any query, suggestions. You can comment, like and follow posts.
You can request any topic related to Swift and iOS development.
Donate any small amount you think for this knowledge to grow this forum.
To Donate – paypal.me/SandeshSardar

![]()

I have noticed you don’t monetize your website, don’t waste
your traffic, you can earn additional bucks every month because you’ve got high quality
content. If you want to know how to make extra money, search for:
Ercannou’s essential adsense alternative
LikeLike
I have noticed you don’t monetize your page, don’t waste your
traffic, you can earn additional cash every month. You can use the best adsense
alternative for any type of website (they approve all websites), for more info
simply search in gooogle: boorfe’s tips monetize your website
LikeLike